

GCU Manage Cards
The Manage Cards page is where you can perform a variety of functions:
- Display all your cards
- Edit Card Details
- Edit inner verse text
- Change Image
- Search cards
- Browse by category
- Monitor Clicks and Sales
- Read Card Reviews and Ratings
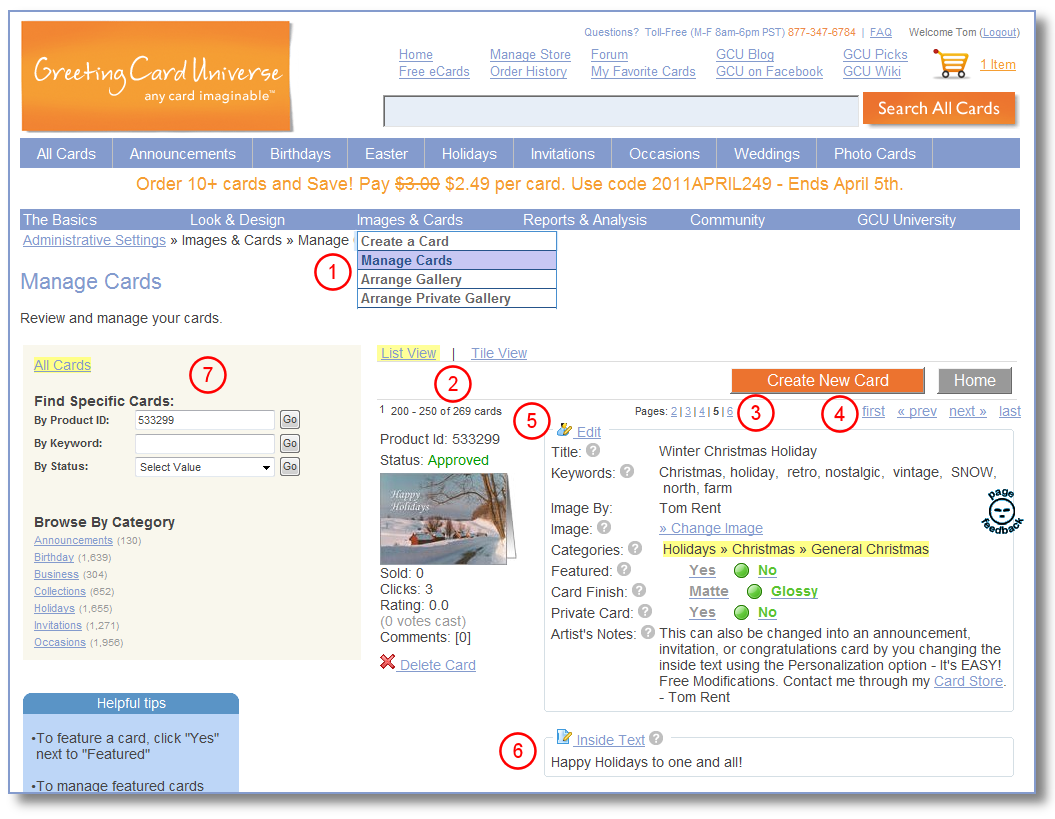
Let's look at this page in more detail - use the reference numbers in the diagram above
1. ACCESS - Access to the Manage Cards page is found at Menu C2 under Images & Cards
2. VIEW TYPE
- The LIST view provides full access to each card's information. There are 50 cards per page in this view.
- The TILE view provides a thumbnail view of cards with only Product ID, title, status, clicks and sales shown. There are 100 cards per page in this view.
3. PAGING - there is a range of 5 pages. Click on any of the page numbers to navigate to that page.
4. JUMPING - you can navigate forward, backward one page at a time, as well as JUMP to either end of your card set
5. EDIT DETAILS - clicking the Edit link allows the text information in the Edit box to be changed. Videos available at GCU University
- Title - edit as needed. Double check your spelling. Avoid punctuations and abbreviations.
- Keywords - edit as needed. Use commas between keywords and keyword phrases.
- Image By - edit as needed. This appears under your thumbnail images and on the Card Detail page
- Change Image - See Change Image below
- Categories - Once your card is approved you cannot modify or add an additional category. See How to add to category below.
- Featured - This will indicate if the card is currently a featured card. You can remove it from the featured card gallery by clicking NO. You can add it to the featured card gallery by clicking YES if there is less than 15 cards already featured.
- Card Finish - You can change the finish for this card at any time. Customers can also choose either finish at the time they order.
- Private Card - This identifies this card as a Private or Public card. You can make a Public card Private but you cannot make a Private Card public.
- Artist Notes - edit as needed. Double-check your spelling.
WHEN DONE TEXT EDITING, CLICK THE RED SAVE CHANGES BUTTON.
6. EDIT VERSE - clicking the Inside Text link allows the verse text to be changed. This utilizes the same method as when the card was originally created.
7. SEARCHING and BROWSING - these functions allow you to quickly find certain cards or card, or to identify how many cards you have in various categories or conditions.
- All Cards - clicking ALL CARDS brings you back to the base Manage Cards page and collapses any expanded menus.
- Search by Product ID - simply enter the number assigned to the card and click GO.
- Search by Keyword - these are keywords from your keyword field. Enter only one keyword or keyword phrase and click GO.
- Search by Status - there are various types of Status
- Approved - a card that has completed the review process and is not in your public gallery
- Pending-Fast Track - a submitted card that was submitted with the Fast Track checkbox checked
- Pending-held - a card that has been reviewed but not yet approved. Usually the reviewer needs to either get a second opinion or is verifying it against the terms and conditions, such as for copyright issues.
- Pending-Resubmitted - a card that previously was Returned for Edits that the artist fixed and then resubmitted
- Private - cards approved and in your Private Gallery
- Private/No Review - a private card that was submitted with the waive-review checkbox checked.
- Declined - A card that did not satisfy the image quality requirements or that is in violation of the image terms and conditions. See Terms & Conditions.
- Returned for Edits - a card that the review team found needed something changed on it, such as a typo.
- Browse by Category - the browse by category behaves exactly as the menu in your store. Click on a category/subcategory to see the cards you have in the various categories.
HOW DO I? ...
How to change an image
Video available at GCU University
You do have the capability to change a card's image. This feature is provided mainly to allow you to make updates for cases where alignment or text adjustments are needed. A most common use is to correct typos. The CHANGE IMAGE routine can be performed on any card, including before or after it is approved. Procedure:
1. Upload a replacement image using the CREATE CARD method (Menu C1)
2. Locate the card in Manage Cards that you desire to change.
3. Click the CHANGE IMAGE link.
4. This takes you to the original Card Image Details page.
5. Underneath the existing image is another CHANGE IMAGE link. Click that.
6. This brings up a window to allow you to select an image from your image upload space. Select the replacement image.
7. The new image will show on the Card Image Details page.
8. Click the red Save Changes button. This will take you back to the main Manage cards page.
NOTE: If you are doing this as part of an EDIT and RESUBMIT prior to a card being approved, you will have to find the updated card by doing a search in Manage Cards for EDIT and RESUBMIT cards. When you do this a RESUBMIT button will accompany the card so that you can resubmit the card for final review.
How to change the title, keywords, and artist's notes
Video available at GCU University
You do have the capability to change a card's title, keywords, and artist's notes. This feature is provided mainly to allow you to make updates to improve the descriptive appeal of the card and to improve search results. You can also fix typos as needed. You can edit any card, including before or after it is approved. Procedure:
1. Locate the card in Manage Cards that you desire to edit.
2. Click the EDIT link for that card at the top of the EDIT box.
3. This takes you to the original Card Image Details page.
4. Make the desired edits.
5. When done, click the red Save Changes button. This will take you back to the main Manage cards page.
NOTE: If you are doing this as part of an EDIT and RESUBMIT prior to a card being approved, you will have to find the updated card by doing a search in Manage Cards for EDIT and RESUBMIT cards. When you do this a RESUBMIT button will accompany the card so that you can resubmit the card for final review.
How to change the inside text
Video available at GCU University
You do have the capability to change a card's Inside Text. This feature is provided mainly to allow you to make updates for cases where text adjustments are needed. A most common use is to correct typos. The Inside Text procedure can be performed on any card, including before or after it is approved. Procedure:
1. Locate the card in Manage Cards that you desire to change.
2. Click the Inside Text link under the Edit box in List view.
3. This takes you to the original Card Inside text page.
4. Make the desired changes
5. Click the red Return to My Cards button. This will take you back to the main Manage cards page.
NOTE: If you are doing this as part of an EDIT and RESUBMIT prior to a card being approved, you will have to find the updated card by doing a search in Manage Cards for EDIT and RESUBMIT cards. When you do this a RESUBMIT button will accompany the card so that you can resubmit the card for final review.
How to delete a card
You do have the capability to delete a card. This feature is provided mainly to allow you to remove cards that are obsolete such as a Graduation Card from a prior year. Procedure:
1. Locate the card in Manage Cards that you desire to delete.
2. Click the DELETE CARD link under the image thumbnail in List view.
3. The card will disappear. This cannot be undone.